quarta-feira, 18 de abril de 2012

What the Heck am I learning in Science Class for Physics?

  WATTS up, guys! As you have read in the title (I hope), in this wonderful and marvelous post, I am going to talk about the things that I learned with my wonderful Science teacher, Ms. Silva (will you give me extra credits now?). In the beginning of our Physics class, my teacher gave me a worksheet with learning goals in them! And yeah I kind of have to use these goals in order to show you what I learned so far. There are 21 goals (OMG x0x), but out of 21, I'm only going to review 13 of them because I already reviewed the first eight goals one trillion times. Ok so prepare yourselves to see what I learned about...........ELECTROMAGNETISM! OOOOOOOOOOOOOOOOOOOOHH!!!! *0*

EM= electromagnetism (couldn't be more obvious? 0.0)

EM9. I can describe the properties and interactions of magnets.
-  The properties of magnets are:
  • That they attract iron or any material containing iron.
  • They can attract and repel other  magnets.
  • When a magnet is swinging freely, one part of it will always point north.
Now, about their interactions...well it is just like the interactions between electric charges. Like poles of magnets repel each other (north pole & north pole; south pole & south pole), while different poles will attract each other (north pole & south pole).


EM10. I can describe how the magnetic domains are arranged in a magnetic/non-magnetic material.
"Domains Before Magnetization"= domains of a non-magnetic material
-  In a magnetic material, the magnetic domains are aligned with each other and the electrons are spinning at the same direction, while in a non-magnetic material, the magnetic domains aren't aligned with each other and the electrons aren't spinning at the same direction. Okay guys, in this case, when people say that the electrons "spin" in the same direction, it doesn't really mean that they are actually spinning. The word "spinning" is used as a way to classify the kind of movement that the electrons are doing in a magnetic domain.


EM11. I can explain the connection between electricity and magnetism (electromagnetism).
This image is showing how an electric current can produce a magnetic field (check EM15 for more information)

-  Well for this I can say that electricity produces magnetism and magnetism produces electricity. This relationship is called "electromagnetism".


EM12. I can outline the difference between DC/AC current and its uses.
Lines represent the direction of the current

-  The difference between AC and DC current is that the AC (ALTERNATE current) current alternates direction, while the DC (DIRECT current) current moves in one direction. The AC current is used in transformers, in order to produce a magnetic field (don't know if you recall it, but electricity can produce a magnetic field 0o0) to induce the current to the second coil (INFO: Ever heard of electromagnetic induction? Well it's when you generate an electric current by a relative motion of a conductor of electricity going through a magnetic field - an electric current will be induced in the conductor; in other words, if  you also move the magnet/magnetic field through the conductor, an electric current will also be induced in the conductor). The DC current is used in series and parallel circuits, where the current moves in one direction, from the negative side of the voltage source to the positive side.


EM13. I can explain why the Earth behaves like a magnet and the consequences of it.
Earth's magnetic field
-   As you can see the Earth DOES behave like a magnet (oooooooooooooh!! *0*). This is due to the fact that there is a very hot solid center in the planet, that is surrounded by a layer of melted metal that flows at a certain rate, which produces an electric current that produces the Earth's magnetic field. Now the question that I have is...how can there be an electric current, if the center of the Earth is very hot? For the higher the temperature the more resistance there will be (if you are not understanding any of this electricity thing, than read the big mama post below...GOOD LUCK :3 <3), thus it will be hard for an electric current to flow through the metal. Oh but well it's Physics so anything can happen (just kidding! :b)!

  The consequences for the Earth behaving like a magnet are:
#2- Well it's something like this...
  1. The functioning of a compass for navigation, in which the needle of the compass will try to align itself with the Earth's magnetic field.
  2. The existence of a magnetic field that will protect the Earth from the solar wind by deflecting most of the charged particles that can strip the planet's ozone layer.
  3. Some animals, such as birds and turtles, that can sense the Earth's magnetic field, being contributed in their navigation during their migration.

EM14. I can explain the importance of grounding wires and using fuses/circuit breakers.
Grounding wires (any brown wire is a grounding wire 0.0)


Fuse

Circuit breaker

-  Their importance is to prevent the wire from burning up from the excessive build up of charges and to protect people from receiving an electric shock. And this is how they work: When there occurs a build up of charges in a wire, since the grounding wire connects the wire to the ground, the charges go directly to the ground, since there are many charges in it, which attracts the electric current.

  The fuse, when there's an excessive build up of charges, melts down, thus preventing the current from flowing. And the circuit breaker, opens/breaks the circuit, which also, stops the flow of electrons through the wire. A fuse can't be used anymore after it melts down, on the other hand though, a circuit breaker can, since it only opens instead of melting down, in order to stop the current.

EM15. I can explain how an electromagnet works and cite applications for them.
An electromagnet (don't need to tell you which is the coil and which is the magnet...right? 0.0)
-  An electromagnet consists of a coil formed by a conductor of electricity, with a ferromagnetic material in it. FYI ferromagnetic materials are materials with strong magnetic properties. And this is how an electromagnet works: there will be a current flowing through the conductor (in other words, it must be connected to a voltage source), and (again aiai -.-") an ELECTRIC CURRENT can produce a MAGNETIC FIELD. Because of that, the magnetic domains in the ferromagnetic material will try to align themselves with the magnetic field that is coming from the conductor. Thus all of them will be aligned at the same direction. Therefore, if you read EM10, an electromagnet is produced! A kind of MAGNET that is actually formed by the magnetic field of an ELECTRIC CURRENT! OOOOOOOOOOOOHH! *0*

EM16. I can explain how a simple motor works (parts and function). (<<you can always read my simple electric motor part in the post below...)
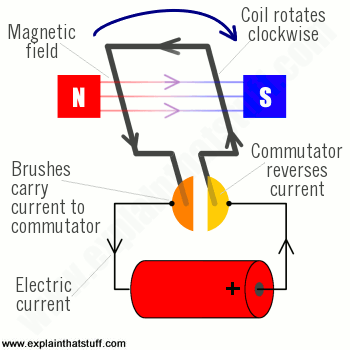
Although I said that the electrons will go from the negative side to the positive side...well, let me tell  you something...IT DOESN'T REALLY MATTER because we only CALL the sides "negative" and "positive", so the actual positive side of the voltage source can be the so-called "negative" side, and vice versa. The one thing that you should know is that the electrons will always leave from one side of the battery and go to the other side. And I think that this is the biggest caption that I ever wrote so far 0.0 Going to my personal Guinness! (...don't have one, 'kay? 0.0)

-   These are the parts of a simple motor: a voltage source, a commutator (split ring if you can see how it is in the picture, it is SPLITTED), an armature/coil, brushes, and a magnet.

  This is how it works:
  1. The electrons will leave the negative side of the voltage source, flow through the commutator, and go through the armature, through the other side of the commutator, and back to the positive side of the voltage source.
  2. The electric current (the flow of electrons) that is flowing through the armature will produce a magnetic field, which will try to align itself to the magnetic field of the magnet.
  3. Because of that, the armature, together with the commutator that is attached to it, will rotate.
  4. The current from each side of the armature will reverse, since each of the sides of the commutator that is attached to each of the sides of the armature, will receive a different current (the left side, through which the current was flowing away from it, that is now on the right side, will receive a current that will flow towards it. The right side, through which the current was flowing towards it, that is now on the left side, will receive a current that will flow away from it).
  5. Because the current reverses on each side of the armature, the magnetic field will again, try to align itself with the magnetic field of the magnet, and it will then rotate.
  6. And this process keeps repeating itself (unless anything that might prevent the motor from receiving voltage from the voltage source occurs).
EM17. I can describe how a generator and a transformer work.
AC (alternating current) generator! (<<the generator that I will be talking about!)

-  Contrary to the electric motor, a generator converts mechanical energy (motion), to electrical energy, and this is how it does it...WAIT, but before I need to say the parts of a generator:
  • A crank
  • An armature
  • A magnet
  • Slip rings (SLIP not SPLIT! Ò.Ó)
  • Brushes
FINALLY this is how it works:
  1. A person, or I don't know...SOMETHING will move the crank (the so-called mechanical energy).
  2. The armature, that is attached to the crank will rotate with it.
  3. Since the armature is located between two magnetic pole, you can say that it will rotate within a magnetic field. But unlike the electric motor, there’s no voltage source! So what happens?
          -Now here’s the thing: can motion produce electrical energy? The answer is yes (if you said no,  go study!). Have you ever heard of electromagnetic induction? It occurs when you generate an electric current through a relative motion of a conductor through a magnetic field (either the conductor can move through the magnetic field, or the magnetic field, through the current).

      4. Since the armature (the conductor) is moving in the magnetic field, a current is induced in it. The current goes in opposite directions in the two sides of the armature.
      5. Like the current in the armature of the electric motor, the induced current in the armature reverses after each half turn of the armature. Because after the two sides of the armature changes side, each side will receive an induced current going in the reversed direction, than their last current. The left side of the armature, through which the current was flowing away from it, that is now on the right side, will receive the induced current that will flow towards it. The right side of the armature, through which the  induced current was flowing towards it, that is now on the left side, will receive the induced current that will flow away from it (imagine that the electromagnetic induction is just like the voltage source, without the positive and the negative sides of course 0.0). Since the current changes directions, an AC current is produced (check EM12).
       6. As the armature turns, the slip rings turn with it. Like the commutator of the electric motor, the slip rings are attached to the ends of the armature and make contact with the brushes. These brushes, in which the slip rings, that receive the induced current from the armature, are attached to, can be connected to a circuit. Thus the generator becomes an energy source.

  OK! Now to the transformer! 


Step-down transformer
A transformer...just messin' with ya xD LOL


  A transformer is a device that increases or decreases voltage. It consists of two separate coils of insulated wire, wrapped around two sides of an iron core. Recall EM15 that there are coils of wire (the conductor) wrapped around a ferromagnetic material (yup, the iron alright!), which then, makes a transformer, an electromagnet! One coil of the transformer, that is connected to a circuit with a voltage source and alternating current, is called the primary coil, while the other coil, that is connected the a separate circuit that doesn’t have a voltage source, is called a secondary coil. And this is how a transferir works:

  1. The primary coil will receive the alternating current (AC). Since an electric current can produce a magnetic field, the AC in the primary coil will do that as well.
  2. The magnetic field will changes as the current alternates.
  3. Because this changing magnetic field is like a moving magnetic field through a conductor, a current is induced in the secondary coil (recall step 3 of the process of how a generator works).
  4. The secondary coil will transport the induced current to another circuit.
NOTE: A transformer only works if the current of the primary coil is an AC. If the current doesn’t keep changing direction, the magnetic field will also not change direction, and so, no current will be induced in the secondary coil. THEREFORE, a transformer WON`T work with a direct current (DC).

  Another thing that I want to add: Why is the iron core necessary in a transformer? The answer is to speed up the electromagnetic induction. Since the iron core will become a magnet (EM15), it will make the current induce to the secondary coil faster. It will kind of act like a fast transportation.


EM18. I can explain the importance of transformers to power grids.
Power grid
...Another power grid -.- (duh!)

  - Have you ever heard of a step-up and a step-down transformer?
   Like its name indicates, a step-up transformer increases something. And this "something" is the voltage. If the secondary coil has more loops, than the primary coil, than the voltage in the secondary coil will be greater. As you can see the electric current in a wire produces a magnetic field. Now, what will happen if you bend many loops in this wire with an electric current? Well you can see that the magnetic field in the new formed coil will be more concentrated, more powerful in other words. The more loops a coil has, the stronger magnetic field there will be in it. And this stronger magnetic field in the secondary coil, is what will induce a lot of current.
   Opposite of the step-up transformer, the step-down transformer decreases the voltage. Unlike the step-up transformer, in a step-down transformer, the secondary coil has less loops, than the primary coil. Therefore there will be less voltage in the secondary coil.

  So, what is the importance of transformers to power grids? The answer for that will be to control the voltage throughout the power grid.

  Step-up and step-down transformers are used in a power grid. Step-up transformers are used to speed up the rate in which the electric current travels to our homes so that we can receive convenient electrical energy. However when you increase the voltage in a transformer, there will be less current in its outcomes (since because of the increased voltage, the electrons will move faster, bumping more into each other). Then why do we still use step-up transformers? Well you can say that although there will be less current, the reduction of the current will only be small, so it won’t really drastically affect the speed of the current.

  Now step-down transformers are used to decrease the huge amount of electrical energy that gets to our homes, to a level that is usable, for if we were to to receive such huge amount of electrical energy, than our devices will burn up because they won’t be able to take it, since it’s too strong for them.

EM19. I can explain methods of power production and distribution.
  - Power can be produced by many energy sources: fossil fuels, nuclear, hydroelectric, biomass, solar, wind, and geothermal. This is how their energy is produced:
Fossil fuel plant
  Fossil Fuels: Fossils are burned, and the heat produced is used to boil water. The steam that is produced by the boiling water turns the turbine, which will turn the generator. Thus electrical energy is produced. In this process you can see that potential energy (fossils burning up) is converted into kinetic energy (steam produced to turn turbines and also, the produced electrical energy). Potential energy - the stored energy of an object at rest that can be used for motion (burning something to release energy, for example), while kinetic energy, which is kinetic energy, does involve motion (in the electrical energy’s case, the electrons push each other).


Ah, one of the disadvantages of fossil fuels is that it REALLY pollutes the air (see all of that freaking smoke?) and can contribute to global warming...LOLz I just wanted to add this picture, because I thought it was funny (got it from a good friend of mine :b). You get the pic?
  
  Nuclear: The nuclei of uraniums are broken apart and a huge amount of energy is released. This huge amount of energy is used to heat up water so that it can produce steam, which will then turn the turbine, which will turn the generator, producing electrical energy. Here, mechanical energy (nuclei being broken apart) is converted into electrical energy. Mechanical energy is also kinetical energy, for it involves motion.
Nuclear power plant


  Hydroelectric: A wall blocks the current of a river, building up huge amounts of water before the ball. The wall is then lifted up and a very strong current is released. The strong current turns turbine which are in the water. The turbines will then turn the generator, which will produce electrical energy. Again, mechanical energy (water turning turbine) is converted into electrical energy.
Hydroelectric power statioooooon!


  Biomass: Wastes (<<biomass) are burned, in order to heat up water, which will then produce a steam which will turn the turbine. The turbine will then turn the generator, which will produce electrical energy. Here, potential energy (biomass being burned) is converted into kinetic energy (steam turning turbine and the produced electrical energy).
Biomass power station

  Solar: Solar power cells are used to collect sunlight. which they will then covert into electrical energy. In this process, electromagnetic energy (light) is converted into electrical energy. Light is an electromagnetic energy because it stimulates the electrons, which will produce current.


Solar power plant

  Wind: Wind is used to turn turbines, which will then turn the generator, producing electrical energy. In this process,  mechanical energy (wind turning turbines) is converted into electrical energy.
Wind turbines!


  Geothermal: Geothermal  energy is what we can call energy from the earth; HEAT from the earth. In other words, areas from shallow ground to hot water or hot rock to a deep underneath the earth, where there is magma. From these areas, hypothermal fluids, which are stream are unleashed. This steam is used to turn the turbine, which again, will turn the generator, which will then generate electrical energy. Here, thermal energy (heat from the earth) is converted into electrical energy.
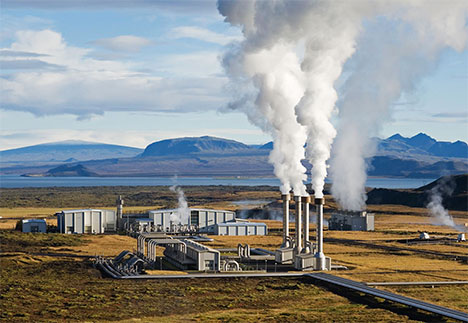
Geothermal power station!

  Now then, how is power distributed to devices? Well it can be distributed with two kinds of voltages: 110V or 220V,  and with different frequencies: 50Hz (hertz) or 60Hz. Hertz is the rate in which current alternates direction. Each kind of voltage and frequency is used in different places. But the two different voltages and frequencies aren't the same though. Between 110V and 220V, 220V is better, while between 50Hz and 60Hz, 60Hz is better, since the AC will be alternating direction faster; working faster - more convenient for devices.

EM20. I can describe the differences of 110V/220V and main advantages and disadvantages for each.
  -The differences between 110V and 220V are that 220V is stronger, than 110V, and unlike 110V, is used to power up devices that require more energy. The advantages of 220V are that it is stronger and devices that are for this 220V work better, since they will receive more power. The disadvantages, however, is if a person were to receive an electric shock, he/she would receive a much painful one (ouch!). The advantage of 110V is that if a person were to receive an electric shock, he/she would receive a less painful one. However, since its a weaker voltage, than 220V, then the devices that uses this kind of voltage won't work as well as the ones that require 220V.


EM21. I can describe the advantages and disadvantages of electrical energy.
ELECTRIFYING, BABY! (...ooookkkkkk forget what I just said... 0.0)

  -The advantages of electrical energy are that it is clean and cheap (ooooooooooooooh yeaaaaaaaaaaaaaaaaaah!). The disadvantages are that there is risk of injury (electric shock) and also, although the energy itself is clean, the way it is generated isn't and may harm the environment (fossil fuels and biomass burn things, which contributes to air pollution).


    domingo, 12 de fevereiro de 2012

    Electricity, Magnetism, a Couple of Projects, and a Story

     Okay, so maybe all good things come to an end, because it appears that I have to edit my what-was-going-to-be-short post. For now, instead of making a post about my electricity quiz (SOMEONE PLEASE TAKE IT!) period. I have to make it longer and talk about the things that I did in these past few weeks in science class (NOOOOOOOOOOOOOOOOOOOOOO!!!). x.x OKAY so I will tell you a "good" story...but first I will tell you my main goal for this unit: to gain enough knowledge in relation to electricity and circuits, in order to be able to apply them in my life (trying to help someone, like my mom, to fix some broken device, for example), for I am VERY BAD in dealing with things related to electricity, and thus, feel useless whenever I have to solve problems related to those things x.x Also, I would like to build something new (...a robot, pehaps?), in order to surprass my cousin, who keeps showing off most of the time, with his freakin robotics knowledge (grrrr >:<)...OKAY STORY TIME :

      Once upon a time, there was this person who was sad because her vacations were ending, and she was bored, so she decided to check her e-mail. When she checked her inbox, she saw that the Science teacher had sent an email to her. As soon as she opened THAT e-mail, she met her fatal doom, for in the e-mail there were instructions for her to build a simple electric motor (which I didn't have a clue about what it was). During the first day of school, in Science class, her teacher had told the class about the project from her e-mail, saying that it was SIMPLE and EASY to build, and right after that she showed a video from the real Star Wars, with Luke (the main dude) trying to learn a certain....um...trick, with Yoda (the green dude with pointy ears) as his tutor. Because he wasn't managing to perfomr the trick properly, Luke started giving up, but his tutor kept telling him to not give up and to believe in his abilities (or something like that...). But Luke chickened out and gave up (don't follow his example peeps! ^^), just to later, have master Yoda show his awesome epicness and start performing the trick (<<it looks as if Yoda is a dog, when I say that he performed a trick 0.0), and made his apprentice like this:
    http://www.abc.net.au/technology/images/general/blogs/nr/mw3/herp-derp.png
      And Yoda said one of those wise phrases that old people usually say in movies: Your biggest mistake, was to give up...or something like that. And the video ended.

      Okay, so the little girl's teacher showed this video with the intention of telling the students to NOT GIVE UP and to BELIEVE IN YOUR ABILITIES, which the girl found strange because it kind of contradicted the thing of the motor being EASY to build. And something smelled fishy to her (not literary -.-).

      After school the little girl came back to her house and decided to start building the motor. So she bought the materials and after reading some site that gave the instructions to build the motor, and watching a video that gave the same instructions, she started builing it, but she failed (x.x). But since she wasn't Luke, she tried again, and FAILED again, and tried again, FAILED again, tried again, FAILED again (...) AGAIN...(*and wasted LOTS of tape). So as predicted by her, the project is actually, difficult (for her). Luckily it was due a couple of days from that day.

      On the next day of school, the little girl decided to ask the teacher for some help, but the teacher just gave her the "c'mon face" and told her that she could do it (she also gave the girl, a thick coil of a copper, which the girl happily took :)).

      And the girl tried again, FAILED again, tried again, FAILED again, and cursed, and cursed again, and FAILED again etc. So she, decided to ask the teacher for some help again, and many times from that time, to the point of making her teacher annoyed and not willing to even talk about motors with the poor girl (don't want to give a bad image of the teacher: she is very nice and just wanted me to be independent and do the motor by myself). On Wednesday, the teacher postponed the due date to next week and that made the girl like this (told you she was nice):

    http://static.fjcdn.com/comments/Derp+_33474575cd03a23b8855fa958b596fa3.png

      The teacher was even nice enough to allow her students to bring their motors on Thursday (the next day), so that they can receive help from those, who miraculously managed to buitl a proper simple eletric motor that works (there were about three students out of 21 0.0). Since on Thursday, the girl's ONLY coil broke due to an unfortunate accident (that I'm not willing to tell xD muahahahahahaha! Die of curiosity!), she didn't manage to receive proper help from her fellow classmates. u.u

      During the weekend, the girl was seriouly loosing her patience, to the point of wanting to throw her magnet* at someone's head, but she was an educated, polite lady, she didn't and instead, started throwing some paperclips at the floor to unleash her anger (I threw MANY 0.0). When she calmed down a bit (after 1 hour 0.0), she decided to read some more sites and watch more videos, regarding building the motor, and later, noticed that there was something wrong with her copper wire*, which seemed to be thicker, than the ones that were shown on the sites and videos. Not to mention that her copper wire had a little bit of a rubber layer on it, which she actually had to remove, in order to make the motor work*. So she removed some of the rubber. She later, noticed that her copper wire was thicker because there were many wires attached together. She also notice that she wasn't using a copper wire, but a SILVER copper wire, which has a different color from a plain copper wire (sorry, I was just kind of dumb at that time...x.x). So she got one wire from the bundle of wires, and used that wire in her motor...and, AND, AND, AND, AAAAAAAAAAAAAAAAAAAAAAAAAAAAAAAANNNNNNNNND, IT WORKED! So she ran aroung her apartment, shouted, screamed, jumped, danced, and told her friends (yeah I actually did that...how embarasing... -u.u-). She later, told her teacher, but never got to show it to her, because somehow, the teacher didn't ask for her students to show her their motors. So the girl thought that her efforts were wasted, and she finally stopped worrying about building that blasted motor.

    The end :)

    *More Information Regarding the 


    Simple Electric Motor Project:


    Simple electric motor
    http://safetypinmotor.com/Pictures/done.GIF


      When my teacher was announcing this project, she showed us a Star Wars video (the "real" Star Wars or whatever) about Yoda (the green dude), trying to teach some trick to Luke (uummm...the dude that is not green), which he (Luke) kept failing and gave up to do it, only to later, see the old tiny green geezer performing the trick (what does he want? A cookie? -.-). My teacher's purpose of showing this video was to teach us NOT TO GIVE UP and to have faith in our own abilities (<<which I believe that she was indirectly telling us that the project, although sounding simple, won't be that easy for us to do - according to my super good intuition).


      And didn't I hit the spot? About 95% of the class failed to build the project (ha-ha me included), while the other 5% succeeded (duh?). But I'm not going to talk about my classmates' activities because this blog is only about ME! >:<


      After about 20 failed attempts, I've managed to finally make the bloody thing work (because of that I've even memorized by heart, the procedures of building the motor x.x).

      To build this motor, you will need:

    • 12 inches of copper wire
    • A permanent marker
    • Tape
    • A D Cell battery
    • 2 paper clips
    • A ruler
    • A magnet
    • And unecessarily, rubber gloves (in case you don't want to get shocked, like I was...about 3 times, which happened to be very painful to the sensitive me T.T)

      Ok, so you start by getting the copper wire. Remove the rubber (if there is one), from it (if it's insulated). Get  a wire from inside of the insulated wire.Next, try finding its center (lets do some math: if the wire has 12 inches, than half of it will be 6 inches - the middle of the wire). Give yourselves a pat on the back if you got that right, and if you didn't, hit yourself, or go back to Elementary School and forget about doing this 0.0). Hold on to the wire in its center part and then put the wire on top of the permanent marker (don't you dare let go of that center point of the wire, you hear me!). Make the two ends of the wire go around the permanent marker about 4 or 5 times, forming many circles. Remove those circles from the marker and DON'T LET GO OF THEM! In order to hold those circles to together, get the two remaining ends of the wire and make them go around the edge of the circle (about 2 times), and pull the two ends, in order to tightly hold the circle (make sure that the ends of the wire are in opposite sides). You now, just made a coil (congratulations)!

      Put the coil on a flat surface, and get the permanent marker. Paint half (one side of the wires) of each side of the extended lines of the coil (paint the part that is facing towards you, while it is laid down on the flat surface).

      Put the coil aside, and get the two paper clips, extend one part of both paperclips, in order to form "P"s. Then, attach the extended part of the paperclips on each side of the battery (make sure it is properly touching the center of the each of the battery's sides). Get some tape, and tape the extended part of the paperclips in each side. Make sure you tape them properly (the paperclips won't be loose on the sides of the paperclip).

      Now put your gloves (if you don't want to get shocked) and try to put the extended sides of the coil, in the hole of the "P" shaped paperclips (make sure the sides of the coil are straight). Get the magnet and put it below the coil. If your coil is not spinning, then use your finger to give it a few spins (after that, it will start spinning). If it's spinning then that means that your motor is functioning well. Congrats! ^^

      IF it's not spinning, well there might be some possible errors for that>
    • You might've not properly placed the extended part of the paperclips in the center of the wire (make sure they are there).
    • The ends of your coil are not very straight.
      Afer some spins, the coil will probably start spinning because some of the ink from the permanent marker, might've come off. To solve that, you can just paint the ends of the coil again (same way as before)!^^
      
      WARNING: Don't leave the coil connected to the battery (inside the paperclips). Or else you will keeping wasting the battery's energy!

    I believe that the way this motor works is like this: the voltage that is produced by the battery gives impulse to an electron from the wire, which will push the other electron, and so on, forming an electric current, that will flow through the paper clips and the coil, until the other side of the battery (since one side of the battery is positive, while the other is negative, and opposites attract). This current, with its negative charges, will create a  negative magnetic field, which will make the circle of the coil attract to the positive pole of the magnet, and start spinning.

    These are some pictures of my motor:
    As  you can see here, I didn't use paperclips, but yes, som very thick copper  material (I believe that you can also use that).

    I also, used a silver copper wire (which also works).


    This is a video of my motor working:

      Oh well, if you want to try to build a simple electric motor then I have to say...that I wish you GOOD LUCK! (<<There are many ways to build a motor, trust me)

      I've tried MANY TIMES to do this motor and FAILED A LOT! It was pretty difficult, but I have managed to build it properly, which made and stil makes me like that weird creepy happy face 0.0. But I believe that the reason why I failed a lot, was because I wasn't thinking outside of the experiment a lot. For example, I just left the rubber of my wire on that bunch of wire (which was pretty stupid I have to admit), and didn't think that since rubber is an insulator, it will disable the electric current in the circuit from flowing properly (which I knew and still know already, okay? -.-). Also, I was so impatient when watching the videos and reading the sites that gave me the instructions to build the motor, that I didn't even observe the motor very well; thus resulting in me not noticing that the wires that were being used in the videos and in the sites, was thinner that than the bundle of wire that I was using. I should learn how to be more patient and more observant. -.-


      And so, a continuation to the little girl's great adventure!

      It was revealed in the end, that the simple eletric motor project was actually a project that was supposed to introduce the class to the next unit in their Science class: Electricity and Magnetism. The little girl, together with her fellow 9th grade classmates, have studied electricity in 7th grade, but she had forgotten some of the things that she learned (I'm not old, but that doesn't mean that I can't forget about some of the things that I've learned two years ago, right?). So then, the teacher decided to start on a new small project, which consisted of the class being divided into groups of three, and create a poster, presenting one of the following themes (that I and co. had learned two years ago):


    1. I can explain how electric charges interact.
    2. I can give example of how charges can be transferred between materials and explain them.
    3. I can explain how an electric current is produced.
    4. I can compare conductors with insulators.
    5. I can explain how resistance affects current.
    6. I can use Ohm's law to calculate resistance, current, or voltage.
    7. I can build series and parallel circuits and describe its parts.
    8. I can explain the relationship between power, voltage, and current.
      The little girl's group ended up getting the 4th theme about conductors and insulators. Thus, they made their poster...

    INFORMATION REGARDING INSULATORS AND CONDUCTORS

    -Insulators- materials that have more resistance, than conductors. They have tightly bounded electrons and are used to stop the flow of charges, the eletric current in other words. Insulators can be rubber and wood.

    -Conductors-materials that have less resistance, than insulators. They have loose electrons and are used to conduct the eletric current (the opposite of insulators). Conductors can be copper wires and other metals.

      On the day of the presentation, all groups presented their posters with their own given themes (duh!). With their presentations, the little girl and her classmates learned:

      How Electric Charges Work

    -Positive charges attract to negative charges.
    -Positive charges repel with other positive charges         (Opposite charges attract and similar charges repel)
    -Negative charges repel with other negative charges.


      Transferring Charges


      -Electrons can be transferred by three kinds of methods:

    • Friction- the transfer of electrons from one uncharged object to another uncharged object through rubbing one material against the other. Example, a person's socks rubbing against a carpet. The electrons move from the carpet to the sock, causing an overall negative charge on the sock.
    • Conduction- the transfer of electrons from a charged object to another charged object by direct contact of a material to another. Example, when a negatively charged sock (that becomes negative after rubbing against a carpet) touches the skin of a person. Electrons are then distributed throughout the person's body.
    • Induction- the movement of electrons to one part of an object that is caused by the electric filed of the second object. Example, when electrons (the electrons gained from the sock) on the person's finger produces and eletric field that repeles the negative charges and attracts the postitive charges on a doorknob.

      Electric Current

    -Electric current (a.k.a. current)- the flow of electric charges in a wire.

    -It's produced by the voltage, which gives an "impulse" to the electrons of the atoms in the wire, which will keep pushing the other electrons and so on, proceeding the charge, and forming an electric current.


      How Does Resistance Affect Current?

    -Resistance- the measure of how difficult it is for charges to flow through a material.

    -Resistance affects current by stopping its flow of electrons.

    -Factors that determine resistance:
    • Material of the wire (ex. conductors, insulators)
    • The length of the wire (long has more resistance, for the current can bump more in the wire's inner wall, and short has less, because the current can bump less :p)
    • The width of the wire (a thin wire has more resistance because less area through which the current can flow, while there is more area in a thick wire)
    • The temperature (the resistance of materials increases as temperature increases, and decreases when temperature decreases)
    -The current will always take the path with less resistance.


      Ohm's Law

    -R=V/I                                    R= resistance/V= voltage/I=curent

    -If voltage is constant: if resistance increases, the current will decreases. If the resistance decreases, the current will increase.

    -Resistance's units= Ω (<<Omega/ohms)
    -Voltage's units= volts
    -Current's units= amperes


      Circuits

    -Series circuits- electric circuits that have one path for the current to flow through.
    • Disadvantages: If a light bulb burns out, it will result in a break in the circuit; therefore the other light bulbs that are in the circuit will not light anymore (since there is only one path for the current to go through). Also, as light bulbs are added to the circuit, the current will decrease, as the amount of resistors (the devices that are connected to the circuit that act like the resistance) will increase, thus the current will decrease and the light bulbs will burn less brightly.
    -Parallel circuits- electric circuits that have more thatn one path for the current to flow through.
    • Advantages: If one light bulb goes out, the others remains lit (since there are more than one path for the current to go through). Also, the overall resistance decreases as new branches are added to the circuits. Since by adding more branches, the current will be able to flow through new paths, therefore, the current will increase, and the resistance will decrease.
    -Circuits' parts:
    • Energy source/battery
    • Switch (often included), which open and closes the circuit
    • Wire
    • Resistors

    Power= Voltage x Current

    -Power- the rate at which one form of energy is transferred to another.

    -Voltage- the difference in electrical potential energy between two places in a circuit.

    -To create more heat in a circuit, you will need more voltage.

      PHEW! And these were all of the themes that were presented, which locks up all of the poster project with a golden key! ;) FYI: We had to write all of this in a blue and green sheet that our teacher gave us x.x

      And NOW comes the third chapter of my WONDERFUL best-seller story!

      After watching all of those presentations and taking notes of their topics, the little girl thought that all of the work had finished, and that she could then, rest in peace. Or so she THOUGH 0.0! Because later, her teacher told the quiz to make a multiple-choise quiz regarding the electricity unit (we are going to start focusing on magnetism later), with 10 questions, in Google Docs...

      Aaaaand I made it! And so far, two people took it (Yaaaayyy!!! Yaaay!), who shall for now, remain anonymous (:p). The link of me FABULOUS, EXTRAORDINARY quiz is right here~:  


      You can take it if you want to (but I bet no one will take it! xD)!

      ER-HERM! Continuing the story: The reason why the teacher told her lovely students to create a quiz was so that they can post it in their blogs and let other people take it, and also, take the quizzes of each other, in order to study for the....................................................................................................electricity test x.x

      Luckily, since the teacher was so nice, she reviewed with her students about electricity AND magnetism (<<which wasn't going to be in the test, but oh well! :p) in a powerpoint that she created, herself. In that powerpoint, she showed a bullet train first. Saying that the train moved through magnetic levitation. She then, showed her students a diagram of a magnetic field of a positive and a negative charge:
    As you can see here, the positive charge's magnetic field is point to the outside, while the magnetic field of the negative charge is pointing to the inside.
    http://www.anthraxinvestigation.com/PS-image-25.jpg
       Sadly, the day after she showed the powerpoint to her students, was the day of the test. Of  course, the little girl did study a lot for the test. :) ...the test was very hard, miss...x.x

    The End

      I hope you noticed that the "little girl" is actually me...0.0

      I have to admit that electricity is pretty easy to understand (I am also getting good grades in works related to the unit), yet when it comes to dealing with real life situations involving electricity, and forget everything, somehow, can't properly apply what I learned in my Science class, to the problem. T^T In electricity, I can't directly and quickly comprehen something that is being taught sometimes, somehow I need to think a lot before I start to understand the concept. By trying my best in that, I am pretty much succeeding in this unit, but that just shows how I have some difficulty (most of the times) in the beginning of the lesson of this unit of electricity. But I believe that the more I keep learning about it, the more I will understand it, and the more I will improve my abilities regarding this unit. SO, I WILL TRY MY BEST (duh! Like I would actually "try my worst" -.-"")! >:>